UserForm is a powerful tool to design custom, professional interfaces for your applications. Back when I started to learn Excel VBA, I was fascinated by the power and beauty of UserForm. It felt like I was designing a real and professional application. I am thrilled to introduce all the UserForm techniques, but first, let’s explore the fundamentals of using UserForm.
Table of Contents
Creating a UserForm
Before inserting a new UserForm, activate the VBE by using “Developer” tab -> “Visual Basic” or simply press Alt+F11.

Press the button indicated in the photo above to insert a UserForm.
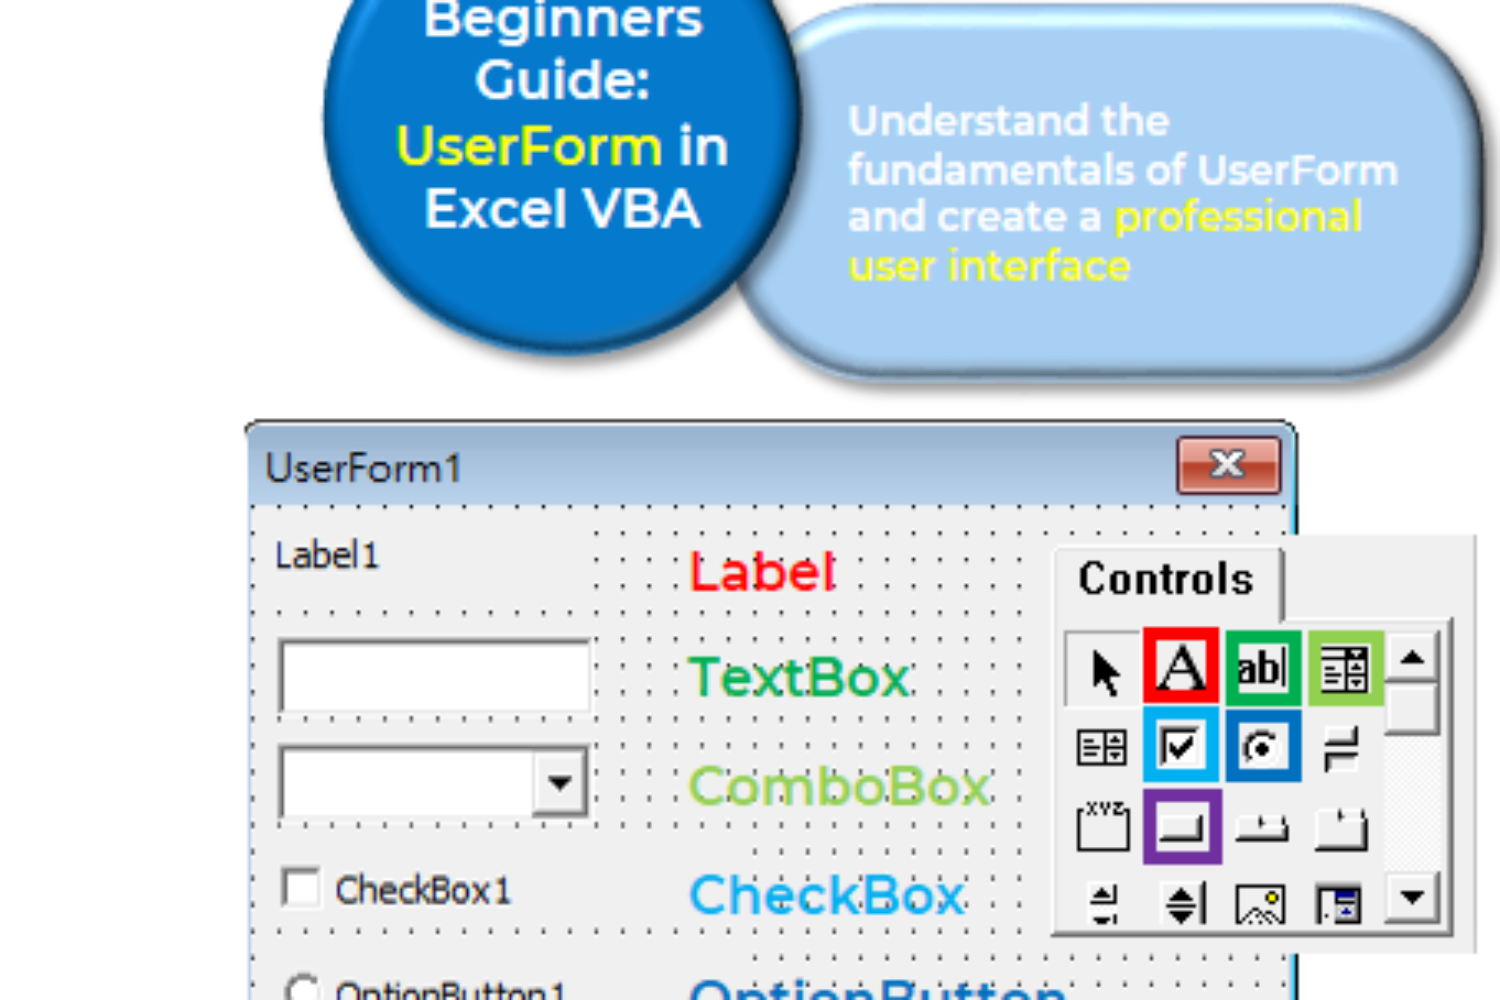
6 commonly used Controls
![]()
After creating an empty UserForm, we can add Controls to our UserForm by selecting from the Toolbox.

These are the 6 most commonly used controls:
| Label | Displays text |
| TextBox | Allows the user input text |
| ComboBox | A drop-down box presenting a list of options |
| CheckBox | Great for binary choice, e.g. True or False |
| OptionButton | Allows the user to select one item from several choices |
| CommandButton | Allows the user to click on the button; often your code are assigned to this button |
There are other useful UserForm controls, such as the MultiPage, ListBox, Frame, etc. Nonetheless, going through each and every control might be overwhelming. We will talk more about the other controls in real life projects.
Properties Window
OK so now you have added some controls. The next step is to modify how it looks using Properties WIndow. Press F4 to display the Properties Window.

This displays the properties of UserForm1. The most common properties to alter are Name, BackColor, Caption and Font:
- Alter the Name of your controls for easier recognition
- BackColor is the background color of your UserForm
- Caption is the title of your UserForm.
- In the Font properties, you can choose the Font, Font Size and even Bold/Italic/Underline
You can also select from the drop down to alter the properties of other controls.

A simple UserForm example
Step 1. Design user interface

Let’s design a UserForm to collect feedback from user by following these steps:
- Change the Caption of the UserForm1 to “Feedback”.
- Add two labels: “Name:” and “Do you like our content on Excel VBA?”
- Add a TextBox; Name it “tbName”
- Add two OptionButton; Alter its caption to “Yes” and “No”; Name it “obYes” and “obNo” respectively.
- Add a CommandButton; Name it “ButtonSubmit”
- Adjust the UserForm size for better visual effect
Step 2. Write code to display the UserForm

1. Insert a Command Button on the worksheet. (Under Developer tab -> Controls)
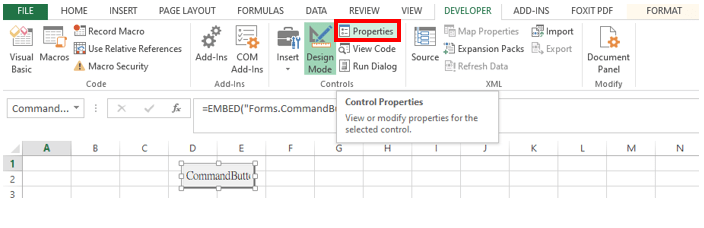
2. Press “Properties” to show the Properties Window.

3. Change the Name to “ButtonSubmitFeedback”; Caption to “Submit Feedback”; Width to 99.75
4. Double-click the CommandButton to open the VBE.
5. Enter “UserForm1.Show”.

When the user “Click” the “ButtonSubmitFeedback”, our code would be executed to display our UserForm. This is called an event handler procedure.
6. Exit the VBE and turn off the design mode.

When the design mode is on, clicking a Control allows the user to select the Control. You can make changes to the control, e.g. editing the properties of Controls and moving the Controls around. On the other hand, when the design mode is off, clicking the button would execute the code.
We intend to show our UserForm upon clicking the button, thus we should turn off the Design Mode.
7. Test the CommandButton

Clicking the button “Submit Feedback” would display our UserForm.
8. Prepare a table for recording user’s entries

Input “Name” in cell A1 and “Do you like our content on Excel VBA?” on cell B1. You can design the colors and borders for your table if you wish.
Step 3: Add event handler to Submit Button
When the user click the Submit button, we want to collect the user’s entries, i.e. the user’s name and whether the user like our content on Excel VBA.
Double click the Submit button to open the VBE.

An event handler procedure is created for our Submit button. Enter the following procedure:

Let’s go through what our code does:
- Identify the last row available using the End(xlUp) function
- Collect user’s entry in the text box and input to Column A.
- Use two If-statements to see which OptionButton is selected and input the respective value to Column B.
- Reset our UserForm for the next entry by clearing the user’s entry and redirect the focus to the textbox.
Step 4: Test your UserForm
Your UserForm should work smoothly. Here’s a video on how the UserForm works:
Summary
Congratulations on successfully creating a simple UserForm! It feels awesome to design and actually use a UserForm in an application. In real VBA projects, you might want to add more controls, but the UserForm fundamentals can still be applied.
Thank you for reading til the end. Please feel free to leave any comments down below 🙂 We greatly value your feedback since it is our drive to improve.
Key takeaways:
- When working with a UserForm, most of your code should be written in an event handler of a CommandButton. The code usually collects user’s entries for subsequent manipulation, such as text from TextBox and the selected option from OptionButton.
- Inserting a CommandButton in a worksheet and assign “UserForm1.Show” to its event handler is a useful way to display your UserForm.
- Work with the Properties Window when designing the user interface.