Everyone has different expenses. Users may want to customize their setting, e.g. add/modify their own categories/sub categories on top of the basic categories. This week, we would upgrade our Excel VBA Userform project – Expense Tracker. We aim to enable users to customize categories/sub categories of your Expense Tracker.If you missed our article last week, check out 6 steps to create an Expense Tracker using Excel VBA UserForm. It illustrates how to develop an Expense Tracker from scratch with 8 features. You can learn how to apply the Excel VBA Userform Fundamentals and VBA Programming Fundamentals in this real-life project.
As always, let’s look at the video about this week’s upgrade.
Step 1. Design user interface

In our previous article, we introduced 6 commonly used Controls in Excel VBA UserForm. This week, let’s introduce 3 new UserForm controls:
- ListBox: presents a list of items; user can select an item or multiple items
- Frame: enclose other controls; for aesthetic purposes or logically grouping controls
- MultiPage: allow user to navigate pages using tabs
We design a MultiPage with two tabs: Record expenses contains controls we explored last week; Edit Categories allows user to view all categories/sub categories in ListBox. We use a frame to group controls under “Category” or “Sub Category”. Then, we can add items to the ListBox through VBA using AddItem.
Step 2. Working with MultiPage

Different size for different pages
Since we have more and bigger controls in page “Edit Categories”, we would like to adjust the size of UserForm and MultiPage on different pages.

Using event handler Change for MultiPage, we can adjust the dimensions of UserForm and MultiPage according to the value (i.e. the page selected)

Activate Page 1 to trigger event handler Change for MultiPage. Therefore, the dimensions would always be ideal.
Step 3. Prepare the Categories Worksheet
Open a new worksheet and name it “Categories”. Enter the Categories and Sub Categories. For example, under “Dining” category, we have 5 rows of sub categories. You can add a table and format it for aesthetic purpose.

Step 4. Manipulate Excel VBA UserForm Controls according to Worksheet Values
Last week, we designed a dynamic ComboBox. This week, we take this one step further: dynamic ComboBox and ListBox in which options are dependent on worksheet values. Therefore, the user can modify value in the worksheet to alter options present in ComboBox and ListBox.
Potential challenge in code writing
A potential problem arises. Let’s say we write code in event handler Change in ComboBox cb_Category. We retrieve values from the worksheet and alter the options accordingly. Then, we copy the code to event handler Change in ListBox lb_Category. That’s not a good practice in programming. What if we have another ListBox that requires the same code? Should we copy the code again? What if we want to add some new features to the code? What if we have some bugs in our code? Do you want to make the same change for three times or more? That’s tedious and time-consuming.
To avoid all these troublesome issues, here’s the challenging part: to write a common procedure that can be used for several controls.
Step 4.1. Use Custom Function to retrieve Categories/Sub Categories from Worksheet

A function performs some calculations and returns a value. For example, “=SUM(1,2)” returns 3. We take this to a new level: use a function to loop through worksheet “Categories” to return an Array containing the Categories.
Insert a new module for our function

Insert a new module named “Functions” to store your user-defined functions. Name your function as ReturnCategories. Different from Sub procedures, we declare the function as Integer/String/Boolean so that it returns a value of that data type. In this case, we declare ReturnCategories as Variant since we want to return an Array.
Declare a dynamic array
First, we declare a dynamic array Categories(). A dynamic array doesn’t have a preset number of elements. We tell VBA how many elements are present in a dynamic array by using ReDim function. For example, ReDim Categories(1) tells VBA that 1 element is present. We put the value on A2 “Dining” into Categories(1).
Use a For-Loop to loop through sheet “Categories”
Second, we use a For-Loop to loop through sheet “Categories”. We add the value on the first column, i.e. the category, to the Array Categories if it is not already in the Array. (Refer to the code IsInArray below, click here to learn more about the IsInArray function)

Before adding the value, we use ReDim Preserve to define a new dimension to our Array while keeping the existing elements.
Return the Array
Just like “=SUM(1,2)” returns 3, our function ReturnCategories() returns a Variant. In this case, we return the Array Categories() as the return value.
Step 4.2. Update Categories for a Specified Control

We pass in ControlName to the sub UpdateCategories. For example, we can pass in “cb_Category” or “lb_Category” as our control name.
- Clear the existing items of the control.
- Retrieve Categories by using our Function ReturnCategories mentioned above. This way, the Array Categories contains the categories specified in worksheet “Categories”.
- Loop through Array Categories to add each item to the control
Step 4.3. Execute UpdateCategories when activating the Expense Tracker

Upon activating the expense tracker, we call the procedure UpdateCategories by passing in “cb_Category”. Therefore, the categories would be added to cb_Category. We repeat the same procedure. This time, we pass in “lb_Category” so the categories would be added to lb_Category.
Beauty of the code:
-
Replicability: When we have more controls, we can pass a different name and use the same code to achieve the same goal.
-
Ease of maintenance: When we want to add new features, we can modify UpdateCategories and ReturnCategories instead of modifying multiple repetitive codes.
Step 4.4. Replicate code for Sub Categories

The concept behind ReturnSubCategories is similar. The difference is that we require an input parameter SelectedCategory. We match the value in column A, i.e. the category, with our SelectedCategory. If it matches, we include the value in column B to our Array SubCategories, provided that the value in column B is not present in the Array.

The concept behind UpdateSubCategories is also similar. Just that we add items to the control for sub categories, i.e. cb_SubCategory or lb_SubCategory. We select the first item the control is a ComboBox with a name beginning with “cb_”.

Similar to the dynamic Combo Box last week, we execute code in Change event handler for cb_Category or lb_Category.
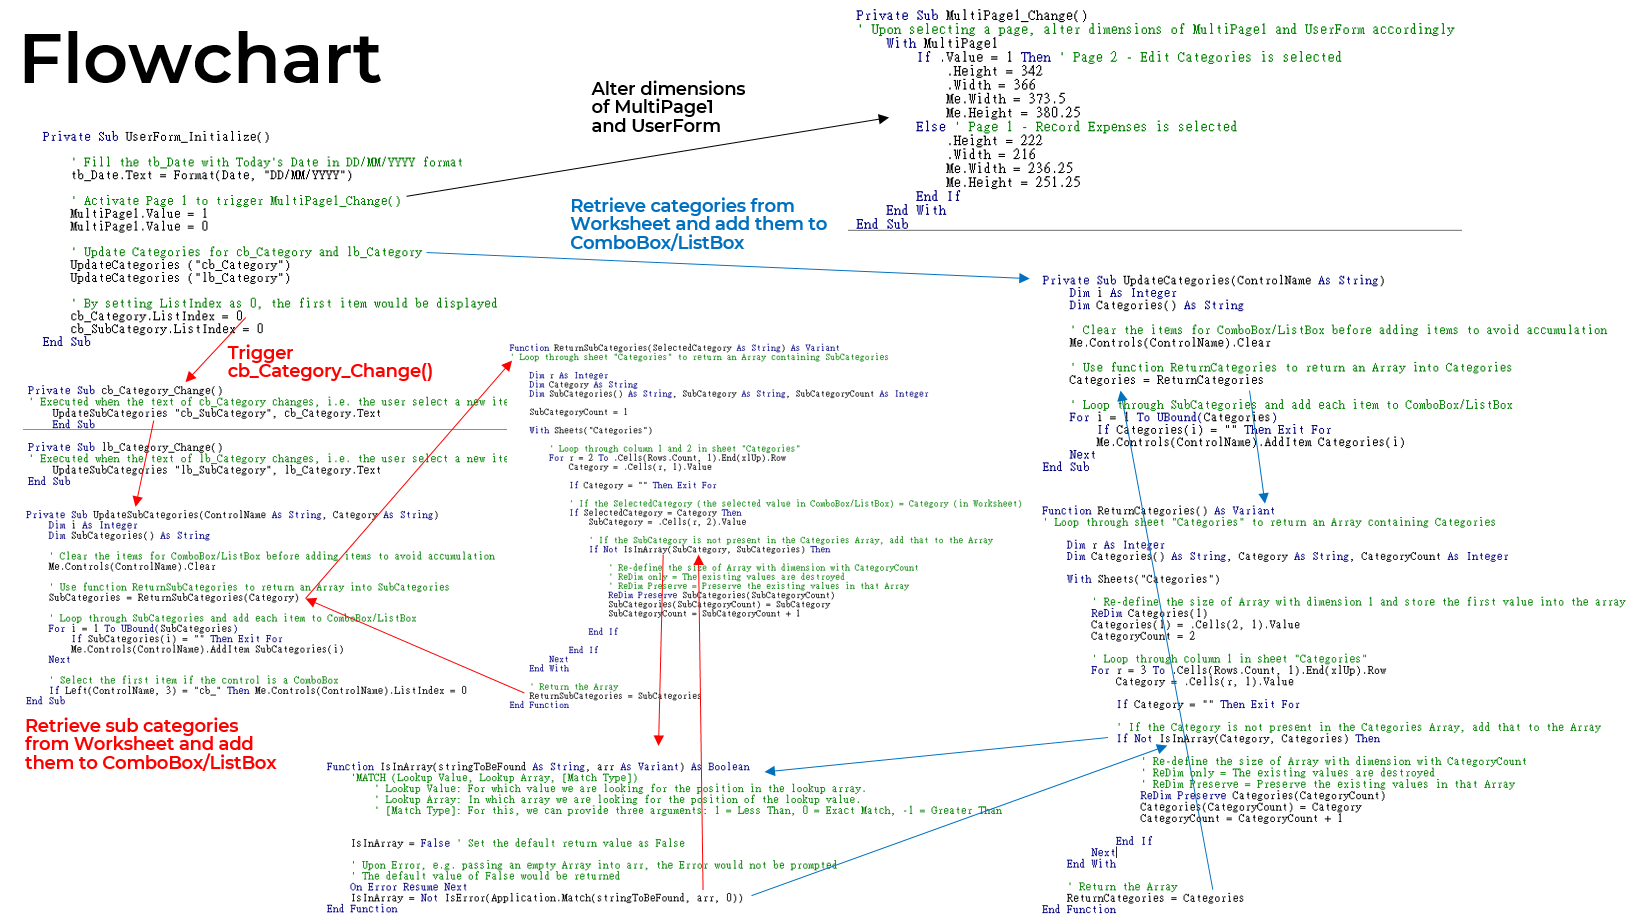
The entire picture
 I know this could be overwhelming. Jumping from one procedure to another. This flowchart hopefully allows you to better understand the flow. For clarity, I recommend viewing this flowchart fullscreen (by double-clicking here).
However, the fundamentals are still similar: using For-Loop to loop through worksheets, using Arrays to store data, using If-statements and With-statements. If you find these overwhelming, I would recommend you to view my 5 most useful VBA codes where I illustrate these concepts. With a good understanding on fundamentals, I am confident that you can navigate my code successfully.
Step 5. Testing your upgraded Expense Tracker
After I edited the categories in sheet “Categories”, the Expense Tracker should automatically accommodate my changes. Let’s watch this video to see how it works:
- I added a duplicated entry “Dining – Lunch”. The Expense Tracker didn’t include “Lunch” twice since Lunch is already present in the sub categories of “Dining”.
- I added a new subcategory “Dining – Afternoon Tea”. The Expense Tracker include this new subcategory under “Dining” in both ComboBox and ListBox.
- I added a new category “Dating – Staycation”. The expense tracker include this new category and subcategory in both ComboBox and ListBox.
For the time being, just ignore the buttons “Add Category” and “Remove Category”. We will explore their uses next week.
Summary
Congratulations on successfully upgrading your Expense Tracker! Despite the challenges, enabling the user to customize their settings according to their need is a crucial technique in developing user-oriented applications. We can’t always tailor everyone’s need, so we should give user the option to customize the settings themselves.
Next week, we would explore further upgrades to the Expense Tracker. Stay tuned!
Enjoy our VBA projects? Check out Template Helper, a simple yet useful VBA project illustrating VBA programming fundamentals.
Thank you for reading til the end. Please feel free to leave any comments down below 🙂 We greatly value your feedback since it is our drive to improve.
Key takeaways
- A resizable MultiPage is a common Excel VBA UserForm technique.
- Design your custom function for repetitive code execution. You can return different data types, such as Integer, String, Boolean, or even Array.
- Declaring a dynamic array and re-defining its dimensions is a great way to work with Arrays when the upper limit of an array is uncertain. Use ReDim Preserve to re-define its dimensions while keeping existing values.
- Placing code in the Change event handler in different controls can improve user experiences.